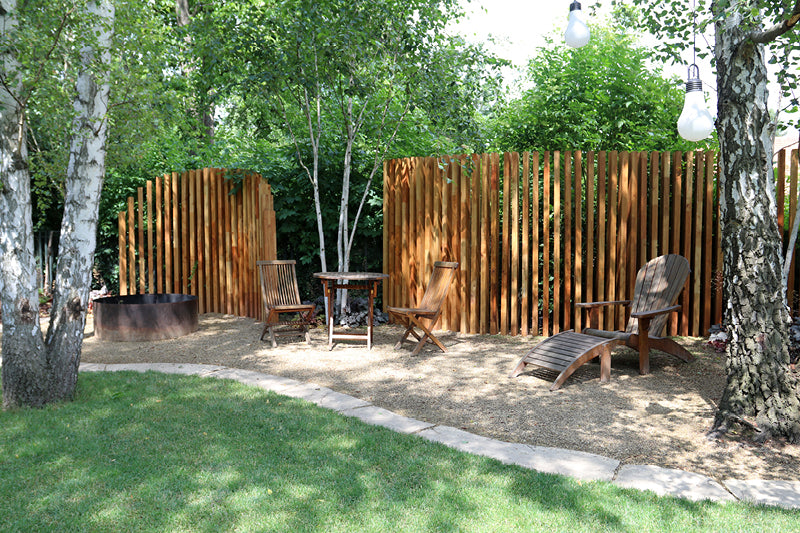
Zum Hauptinhalt
← previous post  / next post →

DIY Beautiful privacy screen built by yourself

Anyone can have a standard wooden fence in their garden, but not a homemade privacy screen! We'll show you how to build a beautiful privacy screen that dispenses with rigid posts and support frames, instead creating a light and harmonious effect from individual horizontal boards.

DIY Schöner Sichtschutz selbst gebaut
© Lars Weigelt

This harmonious privacy screen looks beautiful in any case and, depending on the size of the gaps and the alignment of the boards, fulfills its function as a privacy screen.

Exciting lighting effects add a touch of aesthetic appeal. However, don't plan the fence too high, so it doesn't overwhelm you visually. As a basic measurement for the fence height (this applies to all privacy fences in principle), you should base it on the seating area and determine a certain height by which the fence should extend above your seating height.

If there are buildings nearby, this obviously has to be factored in. If the property is on the outskirts or extends into open countryside, a height of 1.50 m will suffice.

Pumpkin 'Red Kuri' - Cucurbita maxima
€3,90
Celosia - Celosia plumosa 'Fresh-look-orange'
€3,90
Beetroot 'Wintersonne' - Beta vulgaris subsp. vulgaris var. conditiva
€3,50
Garden Strawflower - Helichrysum bracteatum 'Orange'
€3,50

Work steps

1. Paint boards with wood preservative

2. Dig a trench (width approx. 40 cm, depth approx. 70 cm, length as required)

3. Fill in about 10 to 20 cm of drainage gravel

4. Place the first board in the trench, hammer it firmly into place, and install a precisely sawn board (15 x 3 cm, approx. 40 cm long) as a spacer and anti-tip device. If the gap needs to be larger, simply use two or three boards (these can also be screwed or nailed together); alternatively, concrete blocks of the appropriate width (15 cm) can be used.

5. Continue working board by board and insert lawn edging stones on both sides to ensure support on all sides

6. Align everything again; fill the trench to the brim with gravel

For a more robust fastening of the boards
Create a continuous strip foundation (20 cm wide, 40 cm deep) and place the individual boards either with post supports (L-beams or U-beams; depending on the spacing and board thickness), with metal plates (flat connectors) or directly into the concrete (embedded at least 25 cm deep).
Support the boards laterally until they fully harden. The lawn edging stones can also be set in concrete.

Variations
Place some boards slightly slanted, not perfectly straight; vary the fence height by using different gradations along the fence; place boards slightly diagonally, not at right angles to each other; use colored boards.

Fence for lazy people
Obtain pointed round posts (chestnut, pine) and drive them directly into the ground with a sledgehammer, close together, in the desired alignment. Whether perfectly straight and level or with a sweeping, undulating height is up to you.

You have to estimate this

Material for 1 linear meter of fence
20 wooden boards (2 x 15 x 250 cm, Robinia – alternatively oak, Bangkirai, or Ipé), 1 wooden board (3 x 15 x 400 cm; impregnated; coarse lumber is sufficient here), 2 lawn edging stones (concrete, 100 x 25 x 5 cm), drainage gravel, wood preservative (e.g., linseed oil varnish), optional paint; for more robust fastening: 2 bags of garden concrete (Quick-Mix or screed concrete); screws. Tools: spade and shovel, spirit level, saw, toolbox, hammer, sandpaper; for more robust fastening: cordless screwdriver or drill; work clothing and protective equipment.

Indicative costs
175 euros for 1 linear meter of fence with simple fastening at 3 cm spacing. Difficulty: medium.

Time required
2 days without material procurement

→ nächster Post: Permanent planting on the balcony
← vorheriger Post: Bee-friendly perennials: autumn anemone, yarrow, scented nettle & Co.

The content of this article is from the book:

Lars Weigelt
Beautiful privacy screen made by yourself

Price 17.95 €
ISBN 978-3-8186-1275-7
Ulmer Verlag

Nosy neighbors, adjacent streets – there are good reasons why privacy screens are a good idea. In this book, you'll find important preliminary considerations as well as numerous ideas for privacy screens. 20 DIY projects, from the very easy to the truly challenging, provide the tools for anyone who wants to get started. This is guaranteed to turn your garden into a relaxing haven!


Dein Warenkorb

Dein Warenkorb ist derzeit leer.
Klick hier, um den Einkauf fortzusetzen.
Danke, dass du uns kontaktiert hast! Wir melden uns in Kürze bei dir. Thanks for subscribing Thanks! We will notify you when it becomes available! Die maximale Anzahl von Artikeln wurde bereits hinzugefügt Es muss nur noch ein Artikel in den Warenkorb gelegt werden Es sind nur noch [num_items] Artikel übrig, die dem Warenkorb hinzugefügt werden können