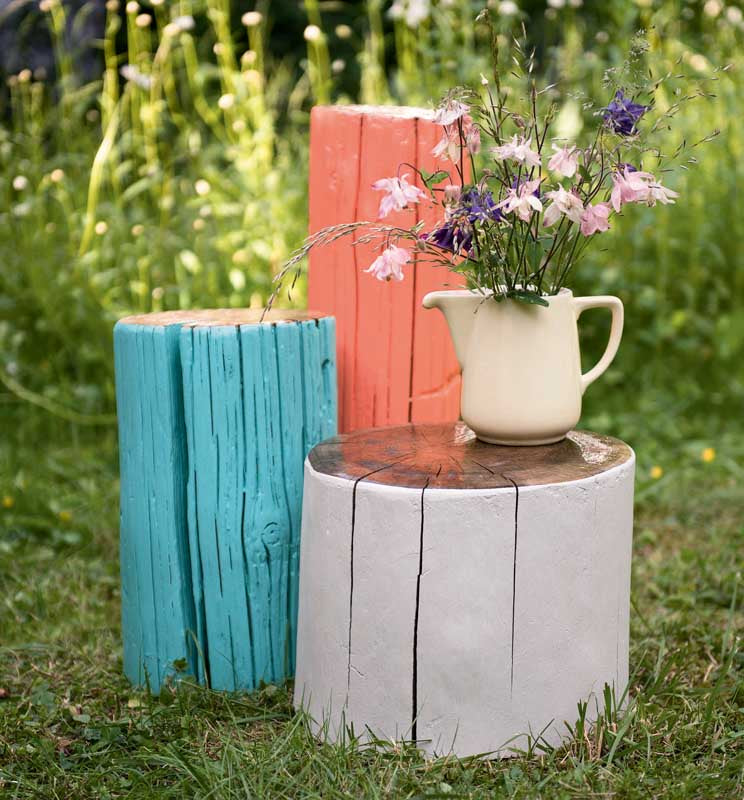
Decorative objects
A walk through nature offers the best inspiration and materials for beautiful decorative objects. Whether you're crafting a miniature garden, a tree stump stool, or an oil lamp for cozy evenings... next summer is sure to come!

miniature garden
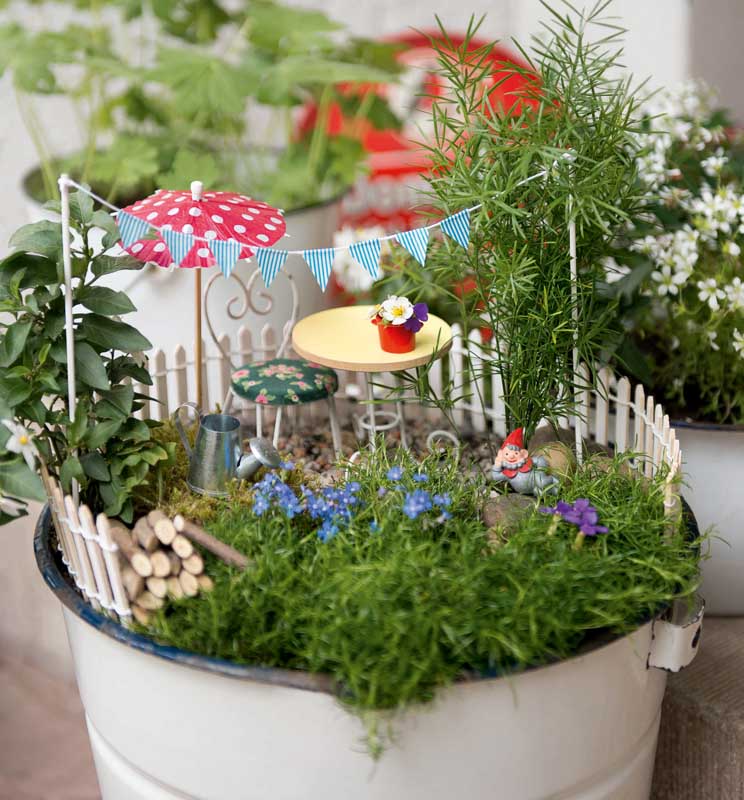
Even a small garden can be delightful—especially this one. Creating a miniature oasis is great fun, sure to pique the curiosity of the viewer, and fits particularly well on a patio or in the entrance of a house.
material
• Enamel bucket
• Styrofoam
• Plastic bag
• Adhesive tape
• Earth
• Small plants, moss
• Pebbles
• Miniature furniture and accessories (e.g. seating group, garden fence, watering can)
Production
To avoid having to fill the entire bucket with soil, first cut a suitable Styrofoam core. There should be enough space in the bucket to accommodate a layer of soil about 10 cm thick. Wrap the Styrofoam piece in a plastic bag and seal it securely with tape.
Place the lightweight package in the bucket and fill it with soil. Shake it well every now and then to ensure all holes are filled and the garden doesn't sink later. Leave about 3 cm of space around the edges and firm the soil down firmly.
Consider where each section of the mini garden should be located and plant small plants in the appropriate spots. Evergreen ground covers, for example, are well suited, as they don't grow too tall and, depending on the variety, also bear small flowers. Moisten the newly planted plants thoroughly.
With pebbles, dollhouse furniture, and a few matching accessories, it's time to finish the garden. The imagination
There are no limits: Whether it's an elf forest, a well-kept front garden or an idyllic retreat - in the mini garden you can easily create what you have long wanted in your real garden.
Tip:
You can quickly make a bunting using string and masking tape. Simply fold pieces of the tape around the string, trim them with scissors, and tie the ends of the string to two wooden sticks.

Colorful tree stumps
What you use these chic, multi-talented pieces for later is, of course, up to you. What's certain, however, is that with a fresh coat of paint and the natural yet accentuated surface, you can create particularly beautiful accents and adapt them time and time again: as a side table, stool, large-format tiered stand, decorative object...
material
• Tree stump
• Sandpaper
• Orbital sander or triangular sander
• Paper and adhesive tape if necessary
• Newspaper
• Small wooden blocks or similar
• Clear coat
• Colored synthetic resin varnish
• Brush and paint roller
Production
It looks particularly attractive when several tree stumps of different heights and thicknesses are placed together. Sand the debarked and cleaned tree stump first with coarse sandpaper, then with finer sandpaper, and smooth it on all sides with the sander. Make sure all wood splinters are removed.
After sanding, the dust must be carefully removed to ensure the varnish adheres well. First, use a small hand broom, then wipe thoroughly with a damp cloth. Allow the wood to dry thoroughly. If you want to paint the top surface a different color than the rest of the trunk, or simply varnish it with a clear coat, mask it off with a piece of paper and tape.
Before painting, cover the ground with newspaper and place the tree stump on a few wooden blocks for easy access from all sides. Now, using a roller, paint the trunk in 2-3 thin coats of the desired color. Always roll in the same direction and be careful to avoid bubbles or drips. If you're not working outdoors, ensure the area is well ventilated!
Once the tree stump is completely dry, the surface can be treated with clear varnish using a wide brush. Apply this coat two or three times to give your new side table (or whatever you're planning to turn this new favorite object into) a particularly beautiful shine.
Tip:
Take the trunk of a deciduous tree – conifers lose a lot of resin and are therefore difficult to work with.

Oil lamps
Even though most evenings are getting cooler, there are still a few hours when we enjoy sitting outside and breathing in the fresh air. Knowing that this won't be possible for a while, we enjoy it even more and make it extra cozy. Atmospheric lighting helps with that.
material
• Storage jars
• Pointed spike or nail and hammer
• Wick for oil lamps
• Lamp oil
Production
Use the spike and a hammer to make a small opening in the lid of the storage jar. The lid must be made of metal and not have a plastic coating! Work on a solid surface and make sure the opening isn't too large (otherwise the wick will slip through). Flatten any sharp, protruding edges at the opening with the hammer.
Pull a wick through the opening and make sure it is the right length: The wick must later be soaked in the lamp oil, so it must reach the bottom of the glass.
Finally, fill the glass with lamp oil, replace the screw cap, and wait until the wick is saturated. Then the little candle can burn.
Tip:
Never leave an open flame unattended! If the lamp produces too much soot, the wick must be shortened.

The content of this article is from the book:
Shanti Wing
Decoration for outdoors –Creative ideas for every season
Munich (blv), 2013, 128 pp., hardcover, approx. 80 pages
ISBN: 978-3-8354-1196-8,, Price: 14.99 € / 15.40 € (A) / 21.90 sFr
More fun outdoors! Decorations give rooms that certain something, that personal touch that shows who lives there and what's important to the owner. Whether linear and as simple as possible or playful and colorful – unfortunately, decorating usually stops just at the front door. Shanti Schwinge wants to put an end to this. In her new book, "Decorating Outdoors," she shows how to put your garden and balcony in the right light. She doesn't stop at the windowsill or front door, either.